Finally, after many tries, I’ve been able to find which is the correct way to create, configure and debug a background task in Windows 8. Let’s make a little step backward: like in the Windows Phone world, Windows 8 apps can’t run in the background. In fact, they are automatically suspended after 10 seconds that the app is not in foreground anymore. To override this limitation, Windows 8 has introduced background tasks, that are operations that can be executed in background when a criteria is satisfied: a timer is expired, a push notification is received, the computer status is changed and so on.
The concept should be familiar to Windows Phone developers: Windows Phone 7.5 has introduced the same way to support background operations. The biggest difference is that Windows 8 background tasks are more powerful: in Windows Phone there are only a few background tasks categories (mainly, based on timer events), while in Windows 8 you can create tasks that are executed when many different conditions are satisfied.
The downside is that, in Windows 8, background tasks are not so easy to implement and debug, mainly because a dedicated Visual Studio template is missing (unlike in Windows Phone), so it’s a bit tricky to understand how they work.
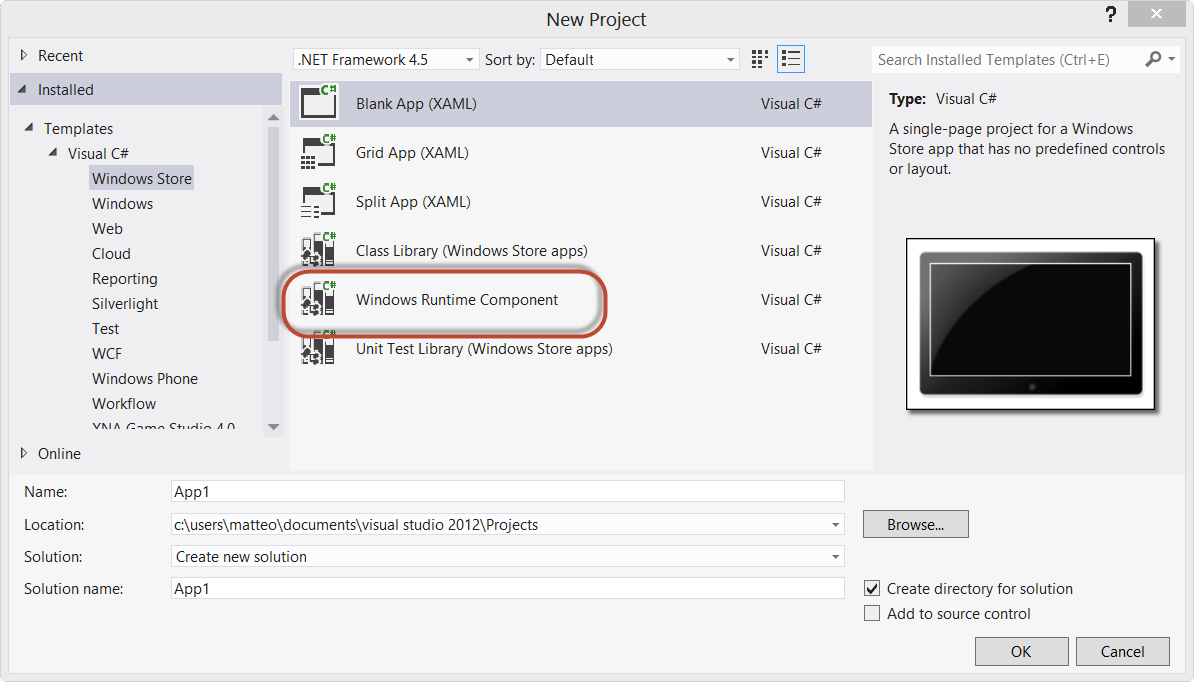
The first important thing to keep in mind is that a background task is a separate Visual Studio project, that is part of the same solution that contains the main application. So, the first step is to create a new project, by right clicking on the solution and choosing Add – New project. The template you’re going to use is Windows Runtime Component, inside the Windows Store category.
It’s important to use this template because, in this case, the output type of the project will be automatically set to Windows Runtime Component (you can see it in the dropdown under the Output type library in the project’s properties). If you use another project’s type (like Class Library) the background task won’t work.
Now let’s proceed to write some code: rename the class that is automatically created with the project to a more appropriate name (for example, NotificationTask) and change it so that it inherits from the IBackgroundTask interface.
This interface will required you to implement the Run method, which is the one that is called when the background task is executed: it will contain all the logic needed to perform the background operations. In this example, I will create a simple background task that displays a toast notification. Here is the method that we use to send the notification, using one of the available templates:
private void SendNotification(string text)
{
    XmlDocument toastXml = ToastNotificationManager.GetTemplateContent(ToastTemplateType.ToastText01);

    XmlNodeList elements = toastXml.GetElementsByTagName("text");
    foreach (IXmlNode node in elements)
    {
        node.InnerText = text;
    }

    ToastNotification notification = new ToastNotification(toastXml);
    ToastNotificationManager.CreateToastNotifier().Show(notification);
}
Using the ToastNotificationManager we get the XML that identifies one of the available templates and we proceed to change the text node, which contains the notification’s text. In the end, we create a new ToastNotification object using the updated template and we shot it using again the ToastNotificationManager.
In the Run method we’re simply going to call this method passing a fake text as parameter:
public void Run(IBackgroundTaskInstance taskInstance)
{
    SendNotification("This is a toast notification");
}
As you can see the Run method comes with a IBackgroundTaskInstance object, that contains all the information about the current task. This parameter is important especially if we’re going to write asynchronous code because, with the architecture we’ve just seen, the task will end before the asynchronous code is completed.
For this reason, we should use a BackgroundTaskDeferral object, that we can get from the taskInstance parameter, as in the following example:
public async void Run(IBackgroundTaskInstance taskInstance)
{
    BackgroundTaskDeferral deferral = taskInstance.GetDeferral();

    //we launch an async operation using the async / await pattern
    await CheckNewItems();

    deferral.Complete();
}
First, we get the BackgroundTaskDeferral object by calling the GetDeferral metohod of the taskInstance object. Then, we execute our asynchronous code (in the example, we call a fake method that checks if there are new items to download) and then, in the end, when everything is complete, we call the Complete method on the BackgroundTaskDeferral object.
Show me some client love
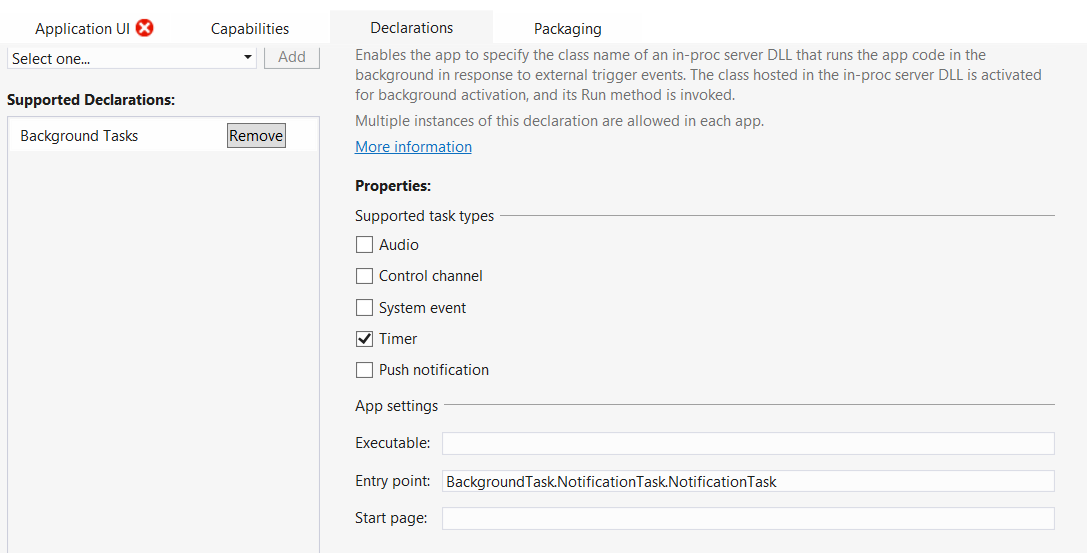
Ok, so far we’ve seen how to create the background task. But how we tell to the client (the real Windows 8 application) to use the background task? There are two steps: the first one is to declare the task in the manifest. Double click on the Package.appxmanifest, so that the visual editor shows up, go to the Declarations section and add a Background Tasks declaration: we’re going to set two important fields.
- The first one is the background task’s type: in our example we’re going to use a timer background tasks, which can be executed periodically. You’ll simply have to check one of the available options.
- The second one is the background task’s full entry point, which is the namespace plus the name of the class. Since in our example I’ve created a NotificationTask class inside a project called BackgroundTask.NotificationTask, the entry point will be BackgroundTask.NotificationTask.NotificationTask.
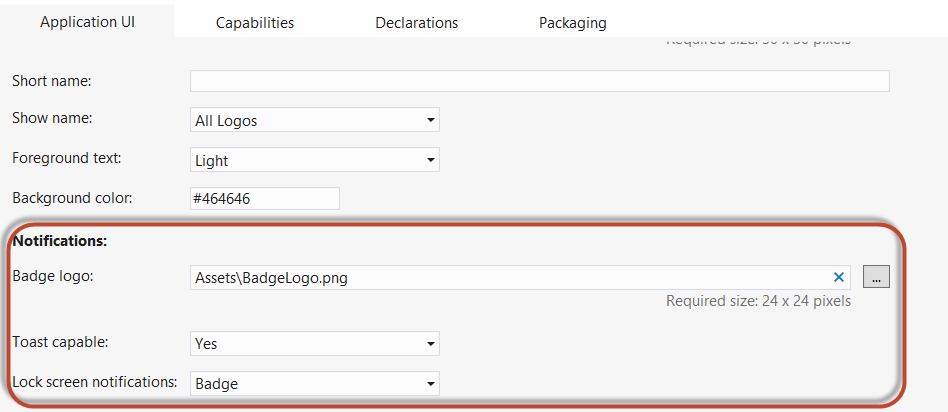
We haven’t finished to edit the manifest yet: as you can see in the image, once we’ve set the background task a warning icon (the white cross over the red dot) appears in the Application UI tab. This happens because when you include a background task which type is Timer, Push notification or Control Channel you are forced to set which type of lock notification you’re going to use. This is required because these kind of background tasks are mainly used to support lock screen notifications.
To do that, open the Application UI tab and:
- Set in the Lock screen notifications option if you’re going to use display just a badge (the icon with a number) or you support also text (like, for example, the Calendar app, that shows the title of the next appointiment).
- Include an icon to use as a badge for lock notifications. It should be an image file with resolution 24×24.
The last thing to do is, in the Notifications section, set the option Toast capable to yes, since the background task we’ve created display toast notifications.
It’s time to write some code… almost
In the next post we’ll see how to register the background task in the code and how Visual Studio 2012 helps us in testing and debugging the background task.


If we set OutputType as Windows store app then the background task will work or not?
I’ve never tried, but I don’t think it will work, it’s strictly required that the background task is a separate project stored in a library, not a Windows Store app.
Very clear and detailed tutorial.
It all worked on the very first try after I struggled for several hours with a lack of guidance.
Thank you so much!
=)
let’s say if i dont take WindowsRuntimeComponent , still i am able to do background functionality or not
– my webservice is not working with WindowsRuntimeComponent 🙁
No, it has to be a Windows Runtime component. What do you mean with “my webservice is not working?”